目次と見出しに入れ子の連番を振る(はてなブログ改造計画)
目次と見出しに入れ子の連番を追加する方法です。
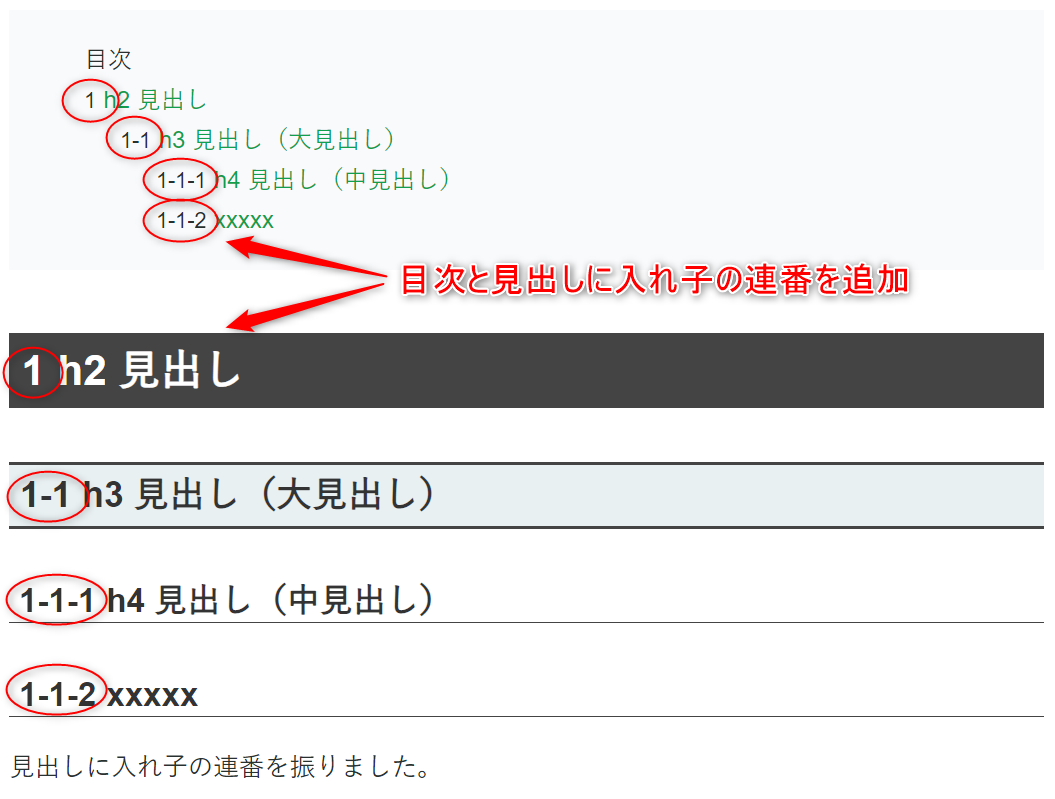
見出しに「1-1」や「2-3-1」といった章や節にあたるような番号を付加し、読んでいる位置を分かりやすくすることが目的です。
変更内容
記事内の目次、見出しが下記のようなデザインになりました。
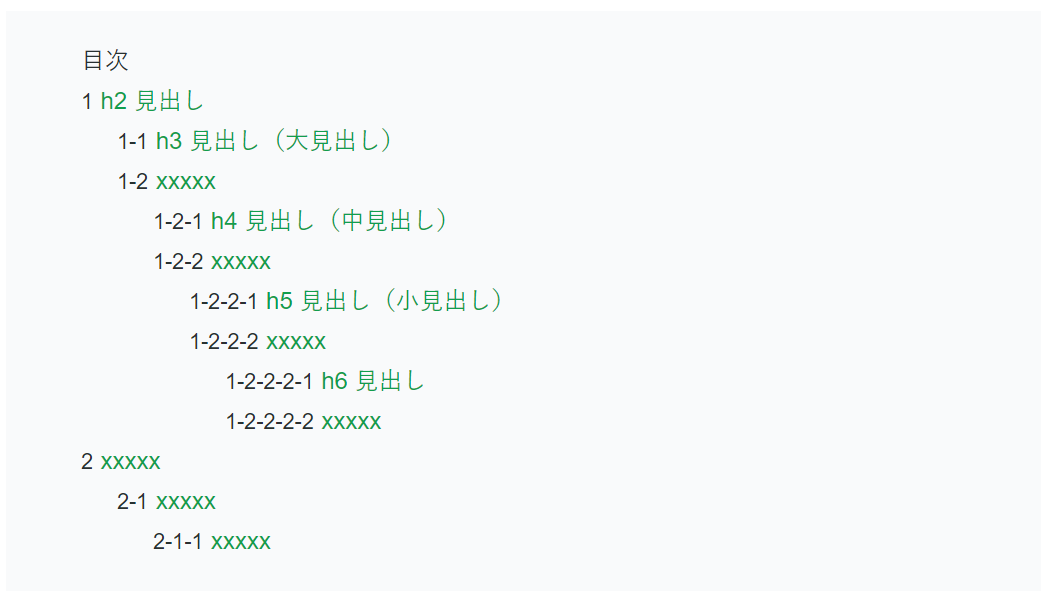
目次の変更
目次だけを切り出すと以下のようになります。これで番号の振られ方のイメージが湧いたでしょうか。こんな感じです。
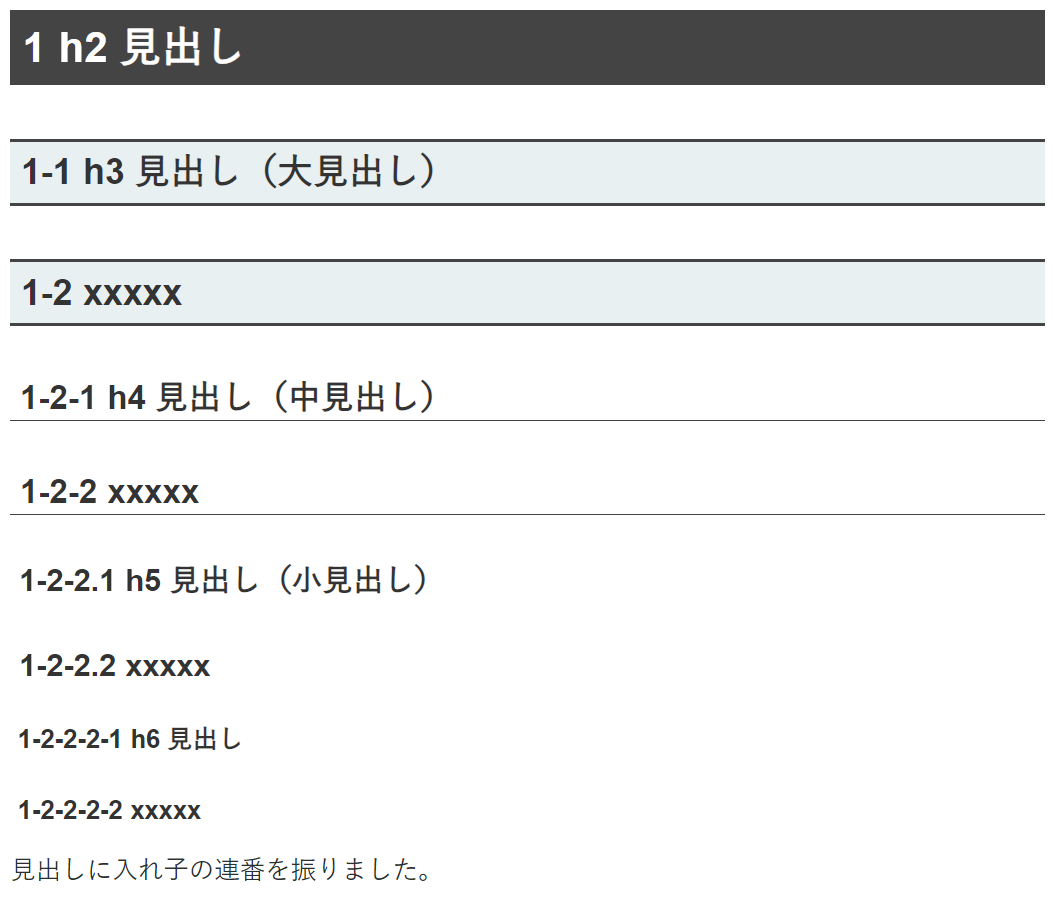
見出しの変更
先程の目次に対応した記事中の見出しはこんな感じになります。
補足)はてなブログは通常 h3, h4, h5 が使われるようです
下記の記事でも書きましたが、、、
設定の「編集モード」を「見たままモード」か「はてな記法モード」にしている場合は、 <h3> , <h4> , <h5> の3つが使われることになります。
なのですが、設定の「編集モード」を「Markdownモード」にしていると <h1> から <h6> まで自由に使えます。
以降では、これらそれぞれに対応した CSS を掲載しています。真似をされる場合はこの点を注意して取り込んでください。
変更方法
変更手順
管理画面から以下のようにたどります。
デザイン > レンチマーク > デザインCSS
ここに追記をします。
追加CSS
通常(大見出し、中見出し、小見出し)の3つのみを使っている人はこちら。
/* 記事内の目次への連番付与 */
.entry-content ul.table-of-contents,
.entry-content ul.table-of-contents ul {
  counter-reset: cnt;
  list-style: none;
}
.entry-content ul.table-of-contents li:before {
  content: counters(cnt, '-');
  counter-increment: cnt;
  font-size: 0.9em;
  margin-right: 5px;
}

/* 記事内の見出しへの連番付与 */
.entry-content {
  counter-reset: cnt-h3;
}
.entry-content h3 {
  counter-reset: cnt-h4;
}
.entry-content h3::before {
  counter-increment: cnt-h3;
  content: counter(cnt-h3);
}
.entry-content h4 {
  counter-reset: cnt-h5;
}
.entry-content h4::before {
  counter-increment: cnt-h4;
  content: counter(cnt-h3) '-' counter(cnt-h4);
}
.entry-content h5::before {
  counter-increment: cnt-h5;
  content: counter(cnt-h3) '-' counter(cnt-h4) '-' counter(cnt-h5);
}
.entry-content h3::before,
.entry-content h4::before,
.entry-content h5::before {
  margin: 0 0.3em;
}
うちみたいに <h2> から <h6> を使っているひとはこちら。
/* 記事内の目次への連番付与 */
.entry-content ul.table-of-contents,
.entry-content ul.table-of-contents ul {
  counter-reset: cnt;
  list-style: none;
}
.entry-content ul.table-of-contents li:before {
  content: counters(cnt, '-');
  counter-increment: cnt;
  font-size: 0.9em;
  margin-right: 5px;
}

/* 記事内の見出しへの連番付与 */
.entry-content {
  counter-reset: cnt-h2;
}
.entry-content h2 {
  counter-reset: cnt-h3;
}
.entry-content h2::before {
  counter-increment: cnt-h2;
  content: counter(cnt-h2);
}
.entry-content h3 {
  counter-reset: cnt-h4;
}
.entry-content h3::before {
  counter-increment: cnt-h3;
  content: counter(cnt-h2) '-' counter(cnt-h3);
}
.entry-content h4 {
  counter-reset: cnt-h5;
}
.entry-content h4::before {
  counter-increment: cnt-h4;
  content: counter(cnt-h2) '-' counter(cnt-h3) '-' counter(cnt-h4);
}
.entry-content h5 {
  counter-reset: cnt-h6;
}
.entry-content h5::before {
  counter-increment: cnt-h5;
  content: counter(cnt-h2) '-' counter(cnt-h3) '-' counter(cnt-h4) '-'
    counter(cnt-h5);
}
.entry-content h6::before {
  counter-increment: cnt-h6;
  content: counter(cnt-h2) '-' counter(cnt-h3) '-' counter(cnt-h4) '-'
    counter(cnt-h5) '-' counter(cnt-h6);
}
.entry-content h2::before,
.entry-content h3::before,
.entry-content h4::before,
.entry-content h5::before,
.entry-content h6::before {
  margin: 0 0.3em;
}
説明
以降、設定した CSS の説明です。
最初に、目次と見出しではそれぞれ別の方法で番号を振っています。 CSS をうまいことやってどちらも同じ数字が振られるように実装しています。ということで、別物であるという前提で読んでいただければと思います。
記事内の目次への連番付与
目次の <ul> に対する装飾と、 <li> の :before 疑似要素に対する装飾の2つを記載しています。
.entry-content ul.table-of-contents,
.entry-content ul.table-of-contents ul {
  counter-reset: cnt; /* 1 */
  list-style: none;
}
.entry-content ul.table-of-contents li:before {
  content: counters(cnt, '-'); /* 3 */
  counter-increment: cnt; /* 2 */
  font-size: 0.9em;
  margin-right: 5px;
}
疑似要素 :before
<li> の :before 疑似要素は、 <li> タグの直前に表示する文言を後付けできる機能です。 content: プロパティで指定した内容が画面上の <li> の前に表示されます。
カウンター
次に表示する内容です。
今回は CSS のカウンターを利用しました。
https://developer.mozilla.org/ja/docs/Web/CSS/CSS_Lists_and_Counters/Using_CSS_counters
使ったのは3つです。
- 1
counter-reset: 変数: カウンター変数の用意と初期化 - 2
counter-increment: 変数: カウンターの値のカウントアップ - 3
counters(変数, つなぎ文字): カウンターを使った文字列を生成
カウンター変数の用意と初期化
1 では、 <ul> タグが出現するたびに cnt という変数が初期値ゼロで用意されることを意味します。分かりにくいですが、 <ul> タグの数だけカウンターが用意されるということです。
<ul> <!-- 1つ目の変数発生 => A -->
  <li>大見出しⅰ</li>
  <ul><!-- 2つ目の変数発生 => B -->
    <li>中見出しⅰ-ⅰ</li>
    <li>中見出しⅰ-ⅱ</li>
  </ul>
  <li>大見出しⅱ</li>
  <ul><!-- 3つ目の変数発生 => C -->
    <li>中見出しⅱ-ⅰ</li>
    <li>中見出しⅱ-ⅱ</li>
  </ul>
</ul>
<ul> の数だけ発生するので、合計3つのカウンターが発生します。CSS 上は cnt という変数名ですが、3つの別々の変数として動きますので注意してください。いや、言い方もヤヤコシイ。。。上記の HTML のコメントに書きましたが、便宜上 A, B, C という3つの変数(という言い方も変だが説明上。。。)に別々の値がキープされるイメージとなります。
カウンターの値のカウントアップ
2 では、カウンターがカウントアップされます。2 は <li> で定義されていますから <li> が出現するたびにカウントアップです。
<ul> <!-- A用意 -->
  <li>大見出しⅰ</li> <!-- A をカウントアップ => 1 -->
  <ul><!-- B用意 -->
    <li>中見出しⅰ-ⅰ</li> <!-- B をカウントアップ => 1 -->
    <li>中見出しⅰ-ⅱ</li> <!-- B をカウントアップ => 2 -->
  </ul>
  <li>大見出しⅱ</li> <!-- A をカウントアップ => 2 -->
  <ul><!-- C用意 -->
    <li>中見出しⅱ-ⅰ</li> <!-- C をカウントアップ => 1 -->
    <li>中見出しⅱ-ⅱ</li> <!-- C をカウントアップ => 2 -->
  </ul>
</ul>
カウンターを使った文字列を生成
3 はカウンターを表示するための文字列を作る関数です。(後で説明する counter(変数) とは別物なので注意。) counters(変数, つなぎ文字) で、内側にも存在するすべてのカウンターをつなぎ文字で繋げた文字にします。
<ul> <!-- A用意 -->
  <li>大見出しⅰ</li> <!-- A => 1 -->     <!-- Aしかない => 1 -->
  <ul><!-- B用意 -->
    <li>中見出しⅰ-ⅰ</li> <!-- B => 1 --> <!-- AとBがある => A + "-" + B) => 1-1 -->
    <li>中見出しⅰ-ⅱ</li> <!-- B => 2 --> <!-- AとBがある => A + "-" + B) => 1-2 -->
  </ul>
  <li>大見出しⅱ</li> <!-- A => 2 -->
  <ul><!-- C用意 -->
    <li>中見出しⅱ-ⅰ</li> <!-- C => 1 --> <!-- AとCがある => A + "-" + C) => 2-1 -->
    <li>中見出しⅱ-ⅱ</li> <!-- C => 2 --> <!-- AとCがある => A + "-" + C) => 2-2 -->
  </ul>
</ul>
<li>中見出しⅱ-ⅰ</li> , <li>中見出しⅱ-ⅱ</li> の部分では、内側に B がないので A と C だけをくっつけた文字になります。
こんな感じの理屈でブラウザでは以下のような表示になります。
- 1 大見出しⅰ
  - 1-1 中見出しⅰ-
  - 1-2 中見出しⅰ-ⅱ
- 2 大見出しⅱ
  - 2-1 中見出しⅱ-ⅰ
  - 2-2 中見出しⅱ-ⅱ
記事内の見出しへの連番付与
記事中にある <h2> から <h6> に振る連番です。
/* 記事内の見出しへの連番付与 */
.entry-content {
  counter-reset: cnt-h2;
}
.entry-content h2 {
  counter-reset: cnt-h3;
}
.entry-content h2::before {
  counter-increment: cnt-h2;
  content: counter(cnt-h2);
}
.entry-content h3 {
  counter-reset: cnt-h4;
}
.entry-content h3::before {
  counter-increment: cnt-h3;
  content: counter(cnt-h2) '-' counter(cnt-h3);
}
/* 中略 */
.entry-content h2::before,
.entry-content h3::before,
.entry-content h4::before,
.entry-content h5::before,
.entry-content h6::before {
  margin: 0 0.3em;
}
カウンター
目次と同様に CSS のカウンターを利用しました。
記述量が多いだけで、目次よりも単純な仕組みですので、目次との違いだけ解説します。
使ったのは3つです。
- 1
counter-reset: 変数: カウンター変数の用意と初期化 - 2
counter-increment: 変数: カウンターの値のカウントアップ - 3
counter(変数): カウンターを使った文字列を生成
目次と違うのは 3 の部分が counters(変数, つなぎ文字) ではなく counter(変数) であることです。
それと、 1 と 2 の定義が <h2> から <h6> までそれぞれでなされていることです。
カウンター変数の用意と初期化とカウントアップ
cnt-h2 , cnt-h3 のようにタグ毎に変数を用意しています。
初期化のタイミングは親にあたるタグにしています。具体的には、 <h3> であれば <h2> が、 <h4> であれば <h3> が登場するタイミングです。( <h2> は記事の最初で初期化した。)
.entry-content { /* 親に当たるタグで初期化。 cnt-h2 は記事の最初 */
  counter-reset: cnt-h2;
}
.entry-content h2 { /* 親に当たるタグで初期化。 cnt-h3 は h2 */
  counter-reset: cnt-h3;
}
.entry-content h3 { /* 親に当たるタグで初期化。 cnt-h4 は h3 */
  counter-reset: cnt-h4;
}
カウントアップは単純に cnt-h2 は <h2> が登場したらカウントアップします。
.entry-content h2::before {
  counter-increment: cnt-h2; /* cnt-h2 は h2 でカウントアップ */
  content: counter(cnt-h2);
}
.entry-content h3::before {
  counter-increment: cnt-h3; /* cnt-h3 は h3 でカウントアップ */
  content: counter(cnt-h2) '-' counter(cnt-h3);
}
HTML 上では下記のような動きになります。
<div class="entry-content"><!-- cnt-h2 初期化 => 0 -->
  <h2>大見出しⅰ</h2>      <!-- cnt-h3 初期化 => 0 --><!-- cnt-h2 増加 => 1 -->
  <h3>中見出しⅰ-ⅰ</h3>                              <!-- cnt-h3 増加 => 1 -->
  <h3>中見出しⅰ-ⅱ</h3>                              <!-- cnt-h3 増加 => 2 -->
  <h2>大見出しⅱ</h2>      <!-- cnt-h3 初期化 => 0 --><!-- cnt-h2 増加 => 2 -->
  <h3>中見出しⅱ-ⅰ</h3>                              <!-- cnt-h3 増加 => 1 -->
  <h3>中見出しⅱ-ⅱ</h3>                              <!-- cnt-h3 増加 => 2 -->
</div>
カウンターを使った文字列を生成
counter(変数) は単に 変数 をそのまま表示するだけの機能です。 counters(変数, つなぎ文字) のような複雑な機能ではありません。counter(cnt-h2) '-' counter(cnt-h3); とあるように、タグごとの変数をくっつけた文字列を書いています。
目次では、 <ul> が入れ子になり、「内側にも存在するすべてのカウンターをつなぎ文字で繋げた文字」を作る方法は有効でした。ですが <h2> から <h6> までのタグは入れ子にはなりません。
ですので、 counters(変数, つなぎ文字) が使えず、 counter(変数) を駆使して表示したい文字列を作った、という訳です。
<div class="entry-content">
  <h2>大見出しⅰ</h2>      <!-- cnt-h2 を表示 => 1 -->
  <h3>中見出しⅰ-ⅰ</h3>   <!-- cnt-h2 + "-" + cnt-h3 を表示 => 1-1 -->
  <h3>中見出しⅰ-ⅱ</h3>   <!-- cnt-h2 + "-" + cnt-h3 を表示 => 1-2 -->
  <h2>大見出しⅱ</h2>      <!-- cnt-h2 を表示 => 2 -->
  <h3>中見出しⅱ-ⅰ</h3>   <!-- cnt-h2 + "-" + cnt-h3 を表示 => 2-1 -->
  <h3>中見出しⅱ-ⅱ</h3>   <!-- cnt-h2 + "-" + cnt-h3 を表示 => 2-2 -->
</div>